Objects and Items
An object is a kind of record. Besides Rooms (client projects), contacts, and client companies, you can create kinds that fit your work, such as contracts or invoices, and decide their items (value fields) and relationships (links between objects).
In this article: Open the settings screen / Built-in objects / Create a custom object / Add items / Add a relationship / Archiving and limits
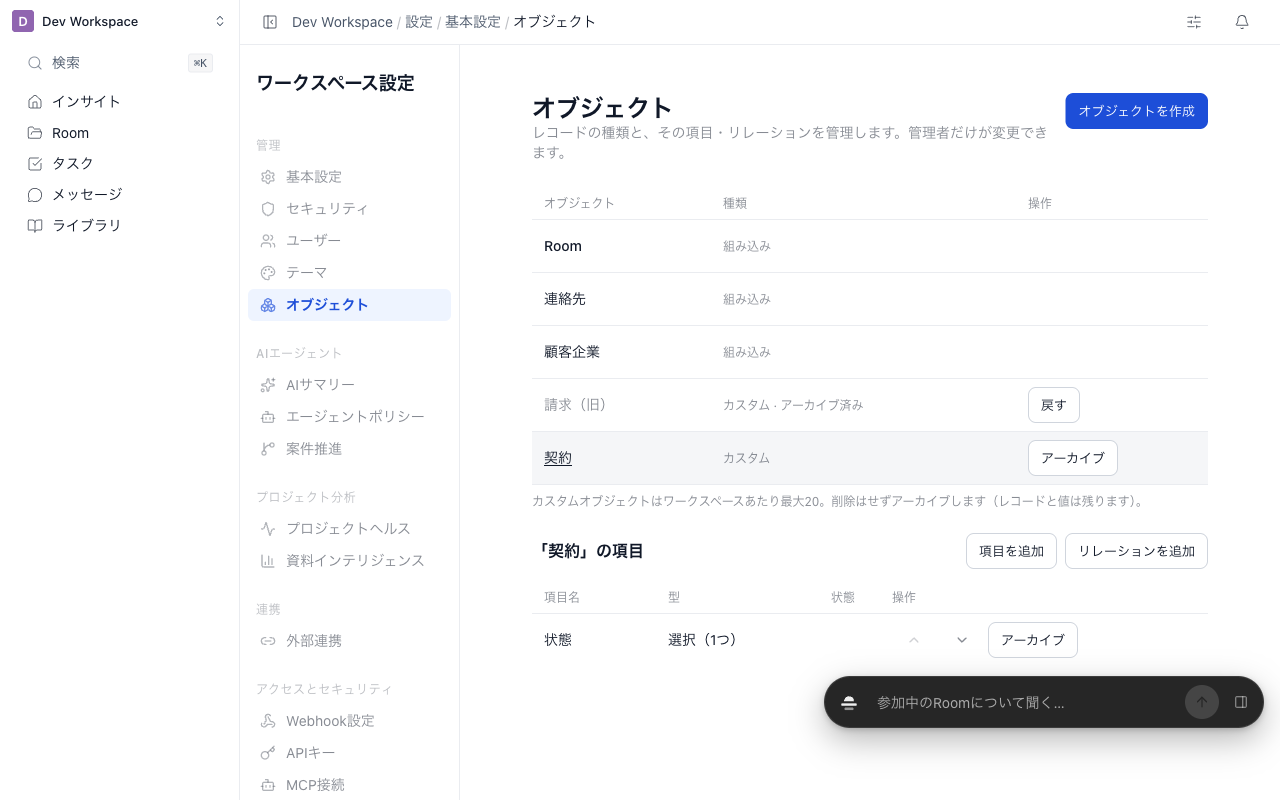
Open the settings screen
- Click the workspace name at the top of the sidebar to open the menu
- Select Settings
- Under Management, open Objects
Only workspace owners and admins can change object, item, and relationship definitions. Members do not see this settings item. Creating records and entering values is separate: every internal member can do that for client companies and custom objects, and the values of a Room can be changed by its editors and above (Record Tables and Views).
Objects, items, and records are internal only. They are never shown to clients (external members) or in public Rooms.
Built-in objects
Three objects exist from the start. Built-in objects cannot be deleted or renamed, but you can add items and relationships to them.
| Object | What it holds |
|---|---|
| Room | The client project itself. Name, project phase, and client company are its original items |
| Contacts | The Room's contacts. Name, email, company name (as typed), and client company are its original items |
| Client companies | The companies you work with. Each has a company name, domain, and logo, and links to client projects and contacts |
The built-in objects are named Room, 連絡先 (contacts), and 顧客企業 (client companies) on screen, whatever your display language. Objects listed with the kind Built-in are built-in objects. Their original items are labeled System and cannot be archived.
Create a custom object
- Click Create object
- Enter a name, an icon, and a Record name label (the heading shown in the first column and on record chips, e.g. Contract number)
- Under Start from, choose Contract template or Blank
- Click Create
| Start from | What is created |
|---|---|
| Contract template | Status, amount, start date, end date, and owner items, plus a relationship to client projects (Rooms) |
| Blank | Name only. Add items afterwards |
The contract template creates its items and options with Japanese names (for example, 状態 for status and 契約金額 for amount). The settings screen does not rename items yet. If you need English names, create your own items with Add item and archive the template items you do not use.
New objects are listed under the Objects heading in the sidebar. Click a name to open that object's table.
Add items
Select an object in the list to show its items below.
- Click Add item
- Enter an item name and choose a type (the type cannot be changed later)
- For select types, write one option per line
- Click Add
Item types
| Type | Values |
|---|---|
| Text | Up to 1,000 characters |
| Number | A number |
| Amount | A number. The currency is the workspace billing currency |
| Date | A date |
| Checkbox | On / off |
| Select (one) | One option |
| Select (many) | Several options |
| Member | A workspace member |
| URL | A URL starting with http or https |
| Relationship | Links to other records (created in Add a relationship) |
Reorder
Use the up and down buttons on each item row to change the order. This order is the default for table columns and record pages.
Add a relationship
A relationship connects two objects and creates an item on both sides (for example, Client project on contracts ⇔ Contracts on client projects).
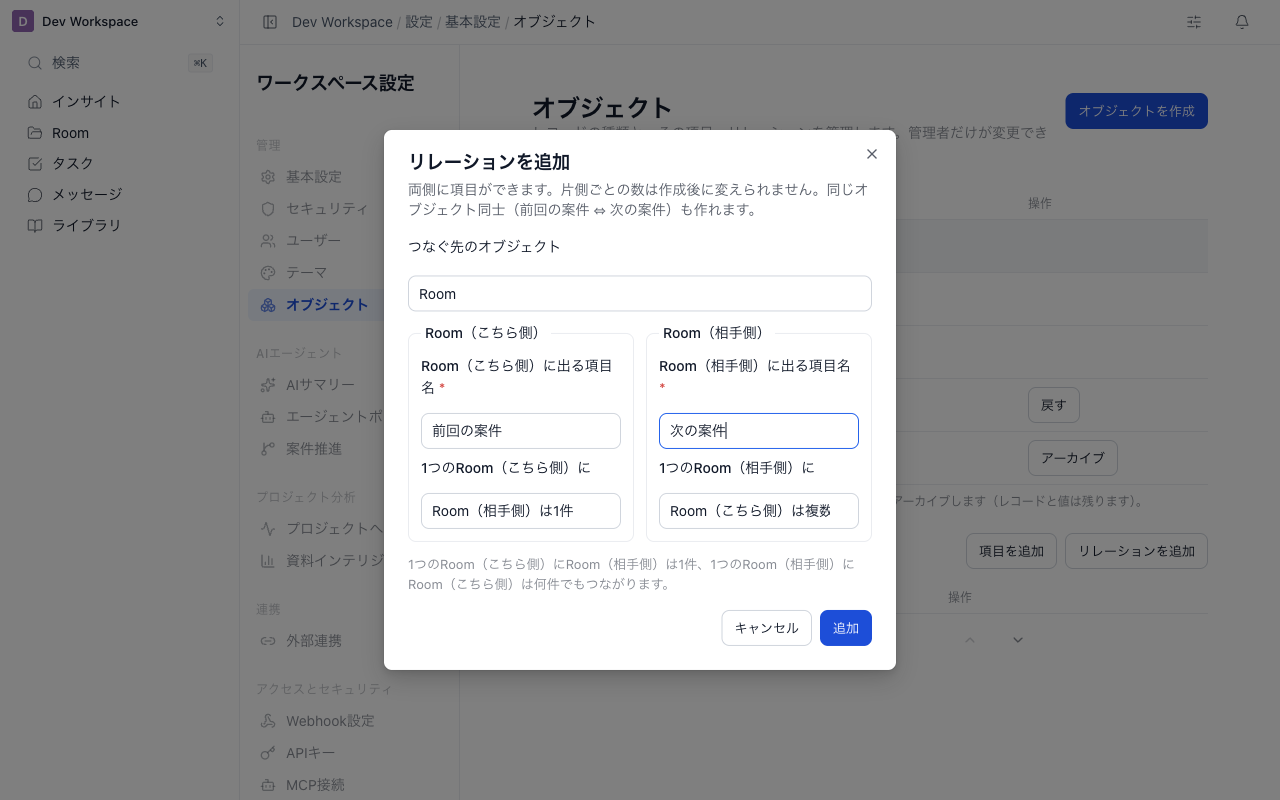
- Select the object to link from and click Add relationship
- Choose the Object to link
- Enter the item names on both sides
- For each side, choose one or many
- Check the sentence at the bottom of the dialog that describes how records link, then click Add
An object can relate to itself (for example, Previous project ⇔ Next project on Rooms). A record cannot be linked to itself.
The one / many choice on each side cannot be changed later. Archiving the item on one side also archives the item on the other side.
Archiving and limits
Objects and items cannot be deleted, only archived. Records and entered values remain after archiving.
- Archive an object: it disappears from the sidebar and lists. Records of an archived object open with an Archived banner and are read-only.
- Archive an item: it disappears from table columns, filters, and record page details.
- Restore: click Restore in the list to bring it back together with its values.
| Limit | Count |
|---|---|
| Custom objects | 20 per workspace |
| Items | 100 per object |
| Options | 100 per item |
When a limit is reached, or you try to change an archived object, a message says it cannot be saved. If another admin changed the definition first, reload the latest content and try again.
Related articles
- Record Tables and ViewsHow to work with Rooms (client projects), contracts, and other records in tables and kanban boards, and save filters, sorting, and columns as named views
- Record PagesHow to edit a record's values in place, link records, and let admins configure the page layout. Also covers the internal-only items on a Room home
- Create Client Companies from a DomainHow to fill a client company's name and logo from its public website using the domain, and what happens when they cannot be filled